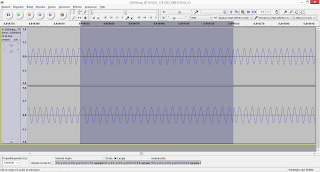

 With Audacity I scrolled through one chirp from start to end and saw a difference in sine frequency. The change in frequency made it look like some parts of the signal "moved" left and others to the "right". This alternated and switched with every phase shift. I've took notes: L= meant moving left, R= meant moving right. I got the following pattern:
RLRLRLRLRLRLRLRLRLRLRLRLRLRLRLRRLRLRLRLRLRLRLRLRLRLRLRLRLLRLRRLLRLRRLRLLRRLRLLRLRRLRLRLRLLRRLRLRLRLRLRLRLRLRLLRLRLRRLLRLRRLRLRL
1234567890123456789012345678901234567890123456789012345678901234567890123456789012345678901234567890123456789012345678901234567890
1 2 3 4 5 6 7 8 9 0 1 2 3
In the pattern i noticed that sometimes the phase shift didn't occur. The "moving left/right" of the sines is because the frequency moved up/down.
In "Wavelet Explorer" i made a spectral analysis and got the following picture:
 This picture is the best indication of how the protocol works.
Notes:
At a samplerate of 3.200.000Hz every 400 samples a phase-shift occurs. If every part betwee phase-shifts (400 samples) is a bit. This would mean that the data rate would be:
3200000/400=8000bps
This picture is the best indication of how the protocol works.
Notes:
At a samplerate of 3.200.000Hz every 400 samples a phase-shift occurs. If every part betwee phase-shifts (400 samples) is a bit. This would mean that the data rate would be:
3200000/400=8000bpsWhen Googling some more on the used K110 IC, i found: "K110 B3 is an Infineon TDK5110 ASK/FSK Transmitter 868/433 MHz" (http://www.domoticaforum.eu/viewtopic.php?f=7&t=127&start=45)
---
It's working.
I've used a HopeRF Miniwireless 868 RF69W module, soldered between pin D7 (Arduino) and DIO2 (RF69) a wire. With this wire it's possible to use "Continuous Mode". In this mode the signal is directly controlled by the Arduino.
if (!rf69.init()) Serial.println("init failed");
if (!rf69.setFrequency(868.260)) Serial.println("setFrequency failed");
RH_RF69::ModemConfig t = { 0x60, 0x06, 0x83, 0x00, 0x9D, 0xf4, 0xf4, 0x00};
rf69.setModemRegisters( &t );
pinMode(7, OUTPUT);
void loop() {
// WC beneden
int signalConnect1[] = {15,41,43,45,57,59,63,73,75,95,99,101,103}; // might not be correct
int signalDisconnect1[] = {15,41,43,45,57,59,63,73,75,91,93,95,97,107,109}; // might not be correct
int signalLow1[] = {15,41,43,45,57,59,63,73,75,95,99,101,103};
int signalMedium1[] = {15,41,43,45,57,59,63,73,75,93,97,101,105,107,109};
int signalHigh1[] = {15,41,43,45,57,59,63,73,75,91,93,95,97,107,109};
int signalTimer1[] = {15,41,43,45,57,59,63,71,73,79,81,89,91,93,95,105,109};
int signalLength1 = 113;
// Wc boven
int signalConnect3[] = {15,49,53,59,61,63,65,73,75,95,99,101,103,107,109}; // might not be correct
int signalDisconnect3[] = {15,49,53,59,61,63,65,79,95,101,107,109};
int signalLow3[]= {15,49,53,59,61,63,65,73,75,95,99,101,103,107,109};
int signalMedium3[]= {15,49,53,59,61,63,65,73,75,93,97,101,105};
int signalHigh3[] = {15,49,53,59,61,63,65,73,75,91,93,95,97};
int signalTimer3[] = {15,49,53,59,61,63,65,71,73,79,81,89,91,93,95,105,107};
int signalLength3 = 113;
// Badkamer
int signalConnect2[] = {};
int signalDisconnect2[] = {};
int signalLow2[]= {31,57,61,63,67,71,73,77,81,89,91,111,117,119,123};
int signalMedium2[]= {31,57,61,63,67,71,73,77,81,89,91,109,113,115,117,121,125};
int signalHigh2[] = {31,57,61,63,67,71,73,77,81,89,91,107,109,111,113,125};
int signalTimer2[] = {31,57,61,63,67,71,73,77,81,87,89,95,97,105,107,109,111,115,121,123,125};
int signalLength2=129;
int signalConnectRepeats =4 ;
int signalDisconnectRepeats =4 ;
int signalTimerRepeats =3;
int* signal = signalLow1;
int signalRepeats = signalTimerRepeats;
int signalLength = signalLength1;
for (int idx2=0;idx2<3 idx2="" p=""> {
rf69.setOpMode(RH_RF69_OPMODE_MODE_TX);
int flip = LOW;
int bc = 0;
for (int idx=0;idx
{
bc ++;
} else
{
flip = !flip;
}
digitalWrite(7,flip);
delayMicroseconds(110);
}
rf69.setOpMode(RH_RF69_OPMODE_MODE_STDBY);
delay(500);
}
delay(20000);
Looking at the data i've gathered. I suspect the bitstream is manchester encoded. It will try to switch from "Continous Mode" to "Packet Mode" as this would save energy when listening for a signal.
-- to be continued --